Compiling and running standalone matlab executable.

August 21, 2012

First, define the paths:

export LD_LIBRARY_PATH=/opt/matlab2012a/bin/glnxa64:/opt/matlab2012a/sys/os/glnxa64:/opt/matlab2012a/runtime/glnxa64/

Compile the .m file

mcc -mv mymatlabfile.m

The matlab compiler generates two execute files: mymatlabfile and run_mymatlabfile.sh

Ignore the shell script generated by matlab. Simply execute ./mymatlabfile 

If you have addpath commands in your .m file, these will cause error while running the standalone executables. To solve this, do the following

if ~isdeployed
    addpath('path1...');
end

If your .m file has input parameters, execute the file in the following way

mymatlabfile para1 para2.

For example, if this is your matlab file

function myprog(num1, num2)

you call the file by

myprog 100 200

Note that the paramters 100 and 200 will be passed as string instead of numbers so you have to modify your .m file:

function myprog(num1, num2)
if isdeployed
    num1 = str2double(num1);
    num2 = str2double(num2);
end

Bash script to run in clusters

#!/bin/bash

# total number = 8677
for i in {1..8599..860}
do
    let j=$i+860-1
    echo "Running $i and $j....."
    srun -c 5 -o output/output$i.txt ./calc_bg_pooling $i $j &
done

echo "Running the last small part....."
srun -c 5 -o output/output8601.txt ./calc_bg_pooling 8601 8677 &

Convert EPS to PDF: problem of bounding box

June 17, 2009

https://sites.google.com/view/chi3x10/home

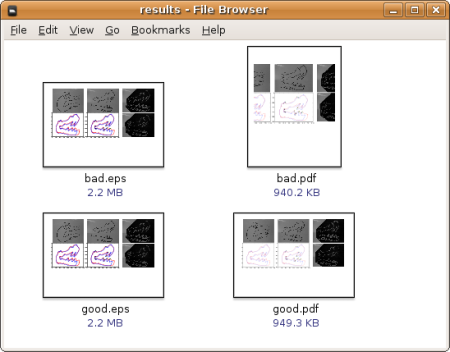
When you save a multiple plots/subfigures figure as an eps file in matlab, the bounding box might not be properly defined. People who use pdflatex need to convert EPS to PDF. The undefined bounding box will cause problems if you use epstopdf to convert EPS to PDF. This problem is shown in the first row in the picture below. The top-left figure is the eps file without properly defined bounding box. Because of this, epstopdf simply printed a letter size pdf file that only contains part of the figure as shown in the top-right figure. You can try to use the option –exact

epstopdf --exact bad.eps

It will probably generate an warning msg like “Warning: BoundingBox not found!” and the resulting pdf is still wrong. One way to fix this problem is to use epstool

epstool --copy --bbox bad.eps --output good.eps

The bbox option tells epstool to generate a (correct) bounding box for the eps file. With a correctly defined bounding box, you can easily convert an eps file to a pdf file.

epstopdf --exact good.eps

The results are shown in the 2nd row of the picture below. epstopdf generated an pdf file in the same size as the eps file.
pic


Install flash player for firefox in ubuntu 8.04

February 1, 2009

1. Open firefox. Go to youtube.com and select any video. If you havn’t install flah, a message of “Hello, you either have JavaScript turned off or an ol version of Adobe’s Flash Player. Get the lastest Flash player.”. Click on the link and you will be redirected to adobe website to download it. Select .deb for Ubuntu x.xx.

2. Let the Package installer software install it. Restart firefox and it should be working.

If it’s still not working, follow the following steps.

3. Open Terminal and input
$> firefox &
to execute firefox.

4. Go to youtube.com and click on any video. It will be just like step 1 but this time you can see the error message from the Terminal. For me, the error messages say
LoadPlugin: failed to initialize shared library /usr/lib/adobe-flashplugin/libflashplayer.so [libnss3.so: cannot open shared object file: No such file or directory]
The problem is not in flash player but because of a dependency lib of flash player mssing .

5. Open Synaptic package manager (System >> Administration >> Synaptic package manager) and install the missing lib (libnss3). Restart firefox and the flash should work fine.


WebDAV client with encrypted SSL connection in ubuntu

January 27, 2009

WebDAV is a set of extensions to the HTTP protocol that allow users to edit and manage files on remote www servers. Here is the installation guide.

1. #> sudo apt-get install davfs2

2. create a folder
mkdir /media/webdav

3. Mount remote webdav server by
sudo mount -t davfs https://ip_address:port /media/webdav


Using rdesktop to remotely access window XP from ubuntu/linux

August 16, 2008

First, install rdesktop if you don’t already have it. rdesktop is a client software for RDP (remote desktop protocol) which is used in various microsoft OS’s.

$ sudo apt-get install rdesktop

Open a terminal and input

$ rdesktop -f -a 16 <ip/domain name>

where -f is for full screen mode and -a is the connection color depth. -a 16 means 16 bits color depth will be used for this connection. These are the two option I used. Other two useful options are -u <username> and -p <password>.

Press Ctrl-Alt-Enter to switch between full screen and window mode.


Krusader – Linux ftp/sftp/scp GUI

February 24, 2008

Always has to google it when using SCP terminal command?

Krusader is a very powerful commander style GUI file manager for KDE and many other desktop managers such as GNOME. To install Krusader under ubuntu gusty, type
$> sudo apt-get install krusader

Read the rest of this entry »


CGAL Installation guide

February 21, 2008

For Linux (ubuntu)


  1. Install boost. Go to http://boost.org/ to check the newest version available. The newest version as of feb,2008 is 1.34.1.
  2. Open a terminal and input
    sudo apt-get install libboost.*-dev libboost-doc libboost.*1.34.1
  3. Boost is installed in a standard location and should be found by CGAL installation program automatically.
  4. Download latest CGAL from this link.
  5. Decompress the downloaded file by inputting
    sudo tar xfv CGAL-3.3.1.tar.gz
  6. Go to the directory CGAL-3.3.1 and input ./install_cgal -i. -i for interactive mode.
  7. Input T for testing the setup. After the testing, the boost you just installed should appear on the the support for menu.
  8. Type B to build the CGAL library. If you h sudo apt-get install libmpfr-devave error message, like “Compilation of libCGAL static failed”, check the install.log file. That is probably due to the missing of MPFR or GMP. Below are the commands to install them respectively.
    GMP:
    sudo apt-get install libgmp3-dev

    MPFR
    sudo apt-get install libmpfr-dev

    After you install MPFR or GMP, go to the main menu and input S -> 7 or 5 -> 0 to auto find the library. If library is installed correctly, it should appear on the the support for: on the main menu along with other library like BOOST.
  9. If you prefer to install CGAL into other directory, Press I and then D to change the installation directory to any director you want, for example, /usr/local/CGAL. Then press I again to let the installer to copy all include/lib/exe files to the designated directory.
  10. If you have problem creating directory in step 9. Just exit the installer and input the command
    ./install_cgal –prefix /usr/local/CGAL -i.
    Then under the main men, press I and install root directory defined by the –prefix parameter should be changed to /usr/local/CGAL. You don’t need to press D to change the install root directory again. Simply press I, the installer should work fine and all required files will be copied to the designated directory.
  11. DONE! 🙂

Setup bluetooth under ubuntu

February 19, 2008

This is how I made my Kensington PocketMouse bluetooth mouse work in my thinkpad X61.

1. Right click on the bluetooth icon (bluetooth manager) on the panel and select “Browse Device”.

2. Select the mouse and click “Connect”. You will get a error message saying something like “obex://[xx:xx:55:f9:xx:xx]” is not a valid location. Copy this addresss.

3. Open your favorite terminal and type sudo hidd –connect xx:xx:55:f9:xx:xx. Your bluetooth device should work fine now.

4. To make your mouse connected every time you start your computer. You need to do the following.

sudo pico /etc/default/bluetooth

change the following line

HIDD_ENABLED=0
HIDD_OPTIONS=”-i XX:XX:XX:XX:XX:XX –server”

to

HIDD_ENABLED=1
HIDD_OPTIONS=”-i XX:XX:XX:XX:XX:XX –server”

where XX:XX:XX:XX:XX:XX is the device address in step 2. Your mouse should work every time you start your ubuntu. 🙂

-Useful link
https://help.ubuntu.com/community/BluetoothSetup